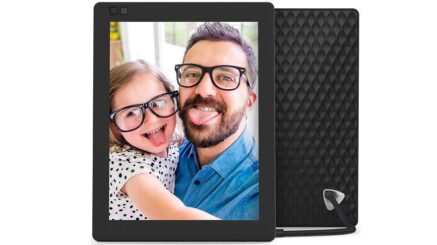
Nixplay Cloud Frames are the easiest way to get in touch with your photos. Place the frame in your loved one’s home and easily email or send photos using the Nixplay Mobile App for iPhone & Android. Using WiFi connectivity, display photos sent from anywhere in the world. With Nixplay you can do many things. How to do Nixplay troubleshooting if anyone of these features does not work?
Nixplay Remote best price
Instant Sharing: Capture moments, add captions and send them directly to any Nixplay Frame.
Nixplay Friends: Invite family and friends to share.
For Everyone: The whole family can start sharing! Anyone can download the Nixplay Mobile App to send photos to loved ones’ frames
Playlists: Create playlists of your favourite moments and choose any combination to display on your frame.
Cloud account: Safe and secure. Enjoy 10GB of FREE Cloud Storage and the ability to connect up to 5 frames.
Frame Settings to suit your preferences: Shuffle Photos, Display Most Recent, Photo Transitions, Captions and Clock
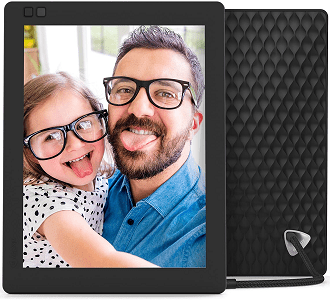
Hu-motion: Nixplay Seed turns on when you enter the room to display your most recent photos and turns off when you leave.
What are the Nixplay troubleshooting tips available in Nixplay Support?
Nixplay troubleshooting tip 1: If Nixplay frame screen is black/blank
There are a few things you could try if you see a black or blank screen (i.e. your frame is not displaying any photos or video):
- Check to see if there are any photos on the frame. If there are no photos on the frame, it will automatically go to sleep after one minute. To check to see if there are photos on the frame, use your remote control, go to Browse Playlist. All photos should appear here.
- Check that the frame is connected to power.
- If you can see a faint display, check the frame’s brightness settings by using your remote control. Go to Frame Settings and adjust the brightness.
Nixplay troubleshooting tip 2: If remote control doesn’t work
If the remote control to your NIX or Nixplay frame doesn’t appear to be working, try:
- Ensure there is no obstruction between the remote control and the frame. Point the remote control directly to the middle of the frame display.
- It is possible that the battery is flat. You can replace the CR2025 (lithium metal) battery by carefully opening the slot at the back of the remote control unit (here’s how).
- If the problem persists, please reach out to our Customer Service team for support.
Nixplay troubleshooting tip 3: If Nixplay frame continuously restarts or reboots
Here are some things you can try if your Nixplay frame is restarting or rebooting automatically:
- Your frame’s Motion Sensor and/or Sleep Functions might be enabled. These features help your frame save power by automatically turning it on or off. Find out how to adjust your frame’s Motion Sensor and Sleep Schedule here.
- Your frame might not be securely plugged into a wall socket. Check if your frame’s power adaptor is securely plugged in. You can also try plugging your frame into a different power outlet.
- Perform a hard reset/factory reset by following these instructions.
Nixplay troubleshooting tip 4: Activate the Hu-Motion Sensor and Sleep functions
Once you log in at www.nixplay.com, go to ‘Frames’ and select your frame. Go to Settings, and look for Sleep Schedule and Motion Sensor. Either function can be activated/de-activated by switching the on/off button.
The Sleep Schedule will send your frame into standby mode at a specific time and switch on your frame at a specific time. Note that the Hu-Motion Sensor will be disabled when the Sleep Schedule is activated.
The Motion Sensor will automatically send your frame to sleep when no-one is around but will re-activate once it detects human motion in the room.
Once you’ve made your selection, remember to hit ‘Save These Settings’.
Nixplay troubleshooting tip 5: If Motion Sensor is set to turn my frame off, but it doesn’t
If you have set the Motion Sensor to turn the frame off after a set amount of time, then it should do exactly that, provided there is no physical movement around the frame within the set time.
On rare occasions, you may find that your frame is not switching off. A known cause of this is close proximity of your frame to an air conditioning or heating unit. The frame’s built-in infrared sensor is looking for changes in infrared energy caused by movement. However, as the sensor is sensitive to changes in temperature, it would include the air conditioner as an object with motion or activity.
For this reason, we recommend that you don’t place your frame near air conditioners or heat emitting devices.
Nixplay troubleshooting tip 6: Auto Power ON/OFF function
The Auto ON/OFF feature allows you to set the frame to turn on or off automatically at a selected time of the day.
Using your remote control, go to ‘Settings’, scrolling down the screen until you see the ‘Auto Power’ ON and OFF time:
- If you want the frame to turn on at 9am, then set “Auto ON” to: 09:00 ON (The word to the right of the time must be set to “on” for the function to be set to on)
- If you want the frame to turn off at 7pm, then set “Auto OFF” to 19:00 ON (The word to the right of the time must be set to “on” for the function to be set to on)
Note: Please be sure to update the frame’s clock to your local time.
Nixplay troubleshooting tip 7: Iris Activity Sensor function
The Nixplay Iris Activity Sensor regularly measures the sound level in the room and then detects variations. It will turn the frame on when it detects increases to the ambient background sound level and off when it’s quiet.
When the Activity Sensor is activated, you can set the sensitivity of the sound threshold which will then turn the frame on or off. A setting of 10 is the most sensitive and will wake the frame with the most ease, while a setting of 1 is the least sensitive.
Within the Activity Sensor, you can set the frame to turn off when no sound is detected after a certain period of time (5 secs, 10 secs… etc).
To activate the Activity Sensor:
- using your remote control, go to Settings, then Activity Sensor
- using your Nixplay mobile app, go to My Frames, select the Settings icon, and then go to Activity Sensor
Nixplay troubleshooting tip 8: Time and/or the timezone setup
When your Nixplay frame is connected to Wi-Fi, the time will automatically be updated. (Here are instructions on how to check if your frame is connected to Wi-Fi).
If the time is incorrect, we recommend checking if your time zone is correctly set.
There are two ways to do so:
- Using the mobile Nixplay app: Select ‘Nixplay’ on the footer menu. Select ‘Settings’ (the gears icon). Under ‘Frame Information’, go to ‘Time Zone’ and select your time zone from the list.
- Using your frame remote control: whilst pointing your remote control at the frame, hit the settings button and scroll to ‘Time Zone’. Select ‘Set the time zone’ to choose your required zone.
How do I find my timezone?
Not sure about your time zone? Go to www.timeanddate.com/time/map and look for your city to find your time zone.
Nixplay troubleshooting tip 9: Send and receive photos
There are 3 ways to share photos to your Nixplay frame:
- By email
- Online
- Via the mobile Nixplay app
Every Nixplay Cloud Frame is required to have an online account where you will be able to manage your Photos, Albums, Playlists and even your contacts/friends.
1. Sending photos via email
When you activate your frame and create a Nixplay Cloud account, you are prompted to create an @mynixplay.com email address. This will be the email address to use if friends, family or you wish to email photos directly to your frame.
If you’ve forgotten your email address, you can find it under the ‘Account’ tab online at Nixplay.com, or under the Settings icon of your mobile app.
To email a photo to your frame, insert/attach that photo to a new email message, and send that email to the @mynixplay.com email address.
To add the photo in an email to a specified playlist, you can enter ‘pl: playlist name’ in the subject line.
When the photo has been delivered to the @mynixplay.com account, it will automatically be stored in the online Albums section, as an album with the email address of the sender at album title.
2. Sending and receiving photos online via www.nixplay.com
Log in with your Nixplay account credentials.
We commend adding photos from various sources to an album first, before creating a playlist and adding that playlist to a frame. You can add photos to your album from:
- Your local drive
- Google Photos
- Dropbox
- Flickr
- Verizon Cloud
- Received emails
- Your mobile phone camera and camera roll
- Your friends
You can share any individual photo directly from your album to a friend. Go to the album, select your photo and click ‘Send to a friend’. Multiple photo selections are possible.
3. Sending photos using the mobile Nixplay App
Download the mobile Nixplay app from the Apple App Store or from Google Play.
Once you have created an account and/or logged in, select ‘Send Photos’ from the home screen. Select whether you want to send photos from your phone camera library or directly from your camera.
When sharing photos from your phone camera library, you can:
- add captions per photograph
- send your photographs to a particular playlist
- send your photographs to a friend
Nixplay troubleshooting tip 10: Google Photos in Nixplay frame
To enjoy photos from Google Photos on your Nixplay frame, you will need to:
- Login to your iOS or Android Nixplay mobile app (please note that the online web application on www.nixplay.com does not support this feature)
- From the home screen in the Nixplay mobile app, go to ‘Photos’ and select ‘New playlist’. Here you have 2 choices:
- Create a standard playlist
- Create a dynamic playlist with Google Photos. Select this option.
- You will then be prompted to make a one-time authorization from your Nixplay account to your Google Photos account. The Nixplay app will guide you through this process, requiring you to enter your Google Photos username and password for authorization.
- Once authorized, you can create your Nixplay playlist from Google Photos. Select:
- All of your most recent Google Photos
- any of your Google Photos albums or
- the automatic ‘category’ albums which Google Photos has created for you.
Any of these options can be selected as single playlists on any of your Nixplay frame(s).
- Each time the album is updated on Google Photos, your Nixplay playlist will be updated dynamically.
- Your Nixplay frame will show up to 1,000 of your most recent photos from Google Photos on any single Nixplay playlist that you have assigned to your frame. (See additional notes below**)
- Nixplay syncs (or updates) Google Photos every hour.
If you experience any difficulties or would like someone to talk you through this process, please feel free to contact us.
** Additional notes:
When you set up a dynamic playlist from Google Photos, you can pick a category, which will automatically sync the most recent 1,000 photos. If you select an album, up to 1,000 photos will be synced from that album, but in the sorting order that you have set on Google Photos.
You are able to set the sorting order of the album within Google Photos. Go to the album, select ‘More options’ on the top right, select ‘Edit album’ followed by ‘Sort photos’.
For example, if you set ‘Newest first’ in Google Photos, the newest photos will be synced to Nixplay.]
Nixplay troubleshooting tip 11: add friends and sharing photos
The Friends feature allows for the easy and instant sharing of photos between Nixplay accounts.
On your mobile app, go to Friends and select ‘Add Friend’. Enter your friend’s email address. They will receive a notification at this address, requesting them to accept/approve your request (by clicking the link in the email).
Once they have accepted your request, they can download the Nixplay App, and share photos directly from their phone or camera roll to your frame.
You are able to auto-assign photos from specific friends to specific playlists, too. To activate, select your friend (under ‘Friends’ in the mobile app), tap Edit and select which playlist you’d like your friend’s photos to be shared to.
To share photos with friends from the Nixplay mobile app, select ‘Send Photos’. Once you have chosen photos, the next screen will ask which playlist or friends you would like to send your photos to. Select your chosen friend accordingly.
Nixplay troubleshooting tip 12: share photos from Facebook, Instagram and Dropbox
You can add photos from:
- Dropbox (dynamic link available online)
- Google Photos (dynamic link available via Nixplay mobile app)
- Flickr and
- Verizon Cloud
Today this feature is only available online after you login via www.nixplay.com. The dynamic Google Photos connection is set via the Nixplay mobile app.
After logging in, select the ‘Photos’ tab, and the sub-tab ‘Social Media’. You will be prompted to log in to that network to authorise access from your Nixplay account. Once you complete this step, you’ll be able to see photos from your social network. Select which images you’d like, then drag and drop into the playlist of your choice.
Please note that photos from your social media accounts will not be dynamically synced. As you add new photos to your social accounts, you will need to select and subsequently add them to your Nixplay playlists.
Currently, photos from your Google Photos (managed via the Nixplay mobile app) and Dropbox (managed online after login on Nixplay.com) accounts can be dynamically synced with your frame. We’re working on enabling this dynamic sync from other social channels in the near future.
Nixplay troubleshooting tip 13: Nixplay Frame is Stuck on Loading
For Nixplay Wi-Fi Frames:
Try turning the frame off, then turning it on again. If this fixes the issue, make sure your frame’s software is updated to the latest version.
If restarting the frame doesn’t work: You can try performing a factory reset on your frame. Follow these instructions to reset your frame. You should see a blue progress bar on the frame’s screen. If this doesn’t work, please get in touch with our Customer Service team.
For NIX Non-WiFi Digital Photo Frames:
1. Remove the memory card/USB thumb drive, turn your NIX frame off, then turn it on again. If this fixes the issue, make sure your frame’ firmware is updated to the latest version.
Nixplay troubleshooting tip 14: unpair and re-set my Nixplay frame
This article also answers the questions:
- How can I perform a factory re-set on my Nixplay frame?
- How can I unpair my Nixplay frame?
- How can I swipe all personalised settings and content from my Nixplay frame?
Please note that video guides for performing a factory re-set can be found here.
A factory reset will only work successfully if your frame is unpaired from your account.
To Unpair your frame:
- Log in to your Nixplay Account via www.nixplay.com or via your mobile Nixplay App
- Go to “Frames” and select the frame that you would like to unpair from your account.
- Scroll down to Playlist Settings and to the lower right side, click ‘Unpair this Frame.’
- Enter the same Password you used in your Nixplay Account, then click “Yes”.
To reset the frame to original factory settings:
- You need to have a paper clip to hand.
- Unplug the AC Adapter from the frame.
- Using a paperclip, press and hold the reset switch button inside a small hole, location noted below based on model. (Please do not use a push pin as it can damage the switch.
For Nixplay Original Frame models – W08A, W012A, W18A, the reset button is located in the hole below the power plugin.
For Nixplay Edge Frame models – W08C and W13A, the reset button is located in the hole above the SD card port.
For Nixplay Seed Frame models – W07A, W08D and W10A, the reset button is in the hole at the left side of the Frame, near the sensor.
For Nixplay Iris Frame models, it is inside the hole on the side of the frame near the clear raised light sensor. - While pressing and holding the reset button (you should be able to feel a click), plug the AC Adapter back in. (Please do not let go of the reset switch button) On the frame screen, once you see a red rectangle with a blue progress bar inside, you may now let go of the reset switch button. (For other frames, a clock and set of gears will appear when resetting the frame.)
- Please be patient as it takes a few minutes to load displaying a blue loading bar, it may get delayed about half-way and that’s normal.
- After the update, you will be asked to connect the frame to your WIFI connection. Once the frame is connected to the WiFi, the serial number will show up on the screen.
- After re-setting the frame, you will need to pair it again. While the frame displays the Serial Number: Log in to your Nixplay Account.
- Go to Frames Tab then select “Pair New Frame”. Enter your 16-digit Serial Number then proceed with the next steps provided on the Nixplay Web App or Mobile App.
Nixplay troubleshooting tip 15: Nixplay frame flickers from time to time
If the screen of your Nixplay frame flickers, try these troubleshooting steps:
- Plug the frame into a different power outlet.
- If the issue still persists, please contact our customer service team. Kindly include a 10 to a 15-second video showing the frame’s flickering screen.
Nixplay troubleshooting tip 16: Get a replacement or spare part
If your accessories like remote, power adapter or stand are broken or lost, please feel free to contact our Customer Support team.
Please have the following information to hand:
- Order Number
- Model of your frame
- Serial number
- Part needed
- Reason for lost or broken part
- Full Name
- Original Shipping address
Nixplay troubleshooting tip 17: Nixplay frame can’t connect to Wi-Fi
All Nixplay frames will automatically attempt to connect to Wi-Fi once they are plugged in and powered on. There is no external Wi-Fi on/off button.
Update: is your frame a Nixplay Seed 10.1-inch (W10B)? Take a look here for guidance.
If you are setting up a new frame, the setup will force you to log in to a wireless network. Use the up and down buttons on your remote to select the network you want. Press enter and a password prompt will appear.
If you are having difficulties connecting to Wi-Fi:
- Make sure that the SSID and network password are correct. Do note that the password is case sensitive.
- For wi-fi, physical barriers are physical barriers. Walls (and other items) can block signals. Make sure you are in the range of your wi-fi signal. Try placing your frame right next to your router to be extra sure.
- Check that the router firewall and MAC address filtering is on. Some routers have built-in firewalls preventing other devices from being connected to the network. This is the same case as MAC Address filtering, so you won’t be able to connect. Check these settings on the router itself. By default, this feature is not used and should only be a concern if the router has had extra security measures implemented on the router.
- Try to connect to another wi-fi hot spot. Simple as this may sound, this can be a confirmation to the problem of your wi-fi network.
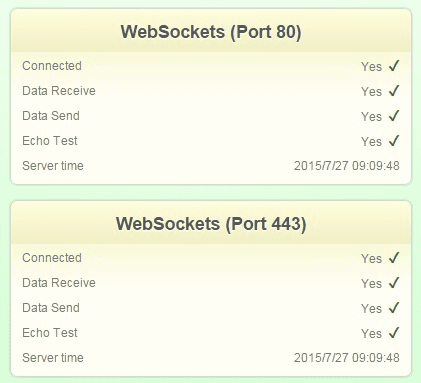
- Check your network web sockets: Nixplay Cloud Frames currently use HTML5 technology utilising Web-sockets to gain a higher level of Internet and Infrastructure efficiency. If you use a desktop browser on a laptop that is on the same Wi-Fi network, visit
www.websocketstest.comto determine if your ISP has deployed web accelerators that can interfere with web-sockets on Port 80 or Port 443.
Some Satellite ISPs will deploy web accelerators and they offer a disabling option to facilitate apps that are having their network traffic impacted. We have added a feature for greater compatibility for those ISPs wishing to deploy web accelerators.
If when you visit the websocketstest.com site survey you don’t have a “Connected” status (“No”) for Port 80 but you do have a Connected Status for Port 443 (“Yes”), then you can go into the Frame’s Main Menu>Settings>Compatibility Settings> and set this value to Port 443.
If your frame is to be newly setup, you will need to connect initially to a different WiFi Network to get the latest software update supporting this compatibility setting feature.
- Power cycling is the most effective troubleshooting step by experience. This helps in releasing any static build-up on any devices. Like any other, computers/machines get tired as well. So, you have to power-cycle both the frame and your router. Disconnect both of them from the power outlet. When plugging them back, connect the router first. Make sure that Internet or WLAN on router lights up (an indicator that WiFi is being set up) before turning the frame back on.