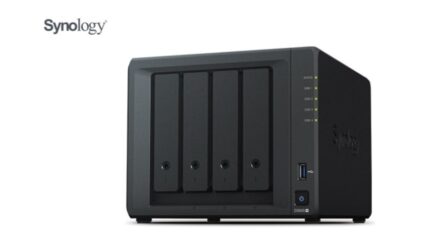
Whether you’re running it to manage your media library through Plex, or want it to run Virtual Machines alongside a personal cloud storage solution, the Synology DS920+ has some excellent features that make it a solid choice. The Synology DS920+ is very much a stable NAS for a medium-sized businesses, or even for the home user looking to get a little bit more from their very first NAS. How to do Synology DS920+ SSD RAM upgrade?
Pros & Cons – Synology DS920+
Pros
- Easy to install
- Dual LAN ports with link aggregation
- Two available M.2 SSD slots
- Large app catalog
- Tool-less drive sleds
Cons
- Lacks multi-gig LAN
- Drives not included
Synology DS920+ specs
- Synology DiskStation DS920+ Specs
- Connection Type Ethernet, USB 3.0
- RAID Level RAID 5, RAID 10, RAID 6, SHR, RAID 0, RAID 1
- Hard Disk Configuration RAID, JBOD
- Network Medium Wired
- Rack-mount or Standalone Standalone
- Media Server Yes
- Remote Access Yes
- Wired Network Speed 10/100/1000
- Bay Size 2.5 and 3.5-inch
- Number of Bays 4
- Printer Server Yes
- External USB Hard Disk Expansion Yes
- UPnP Capable Yes
Synology DS920+ SSD RAM Price
The Synology DS920+ is available now, though pricing in your country will vary depending on taxes and import fees. In the United Arab Emirates for example, the DS920+ is priced at AED 2,520 ($686.09, £546.92, AU$999.28). But how to do Synology DS920+ RAM upgrade DIY?
Synology DS920+ SSD RAM review
Design
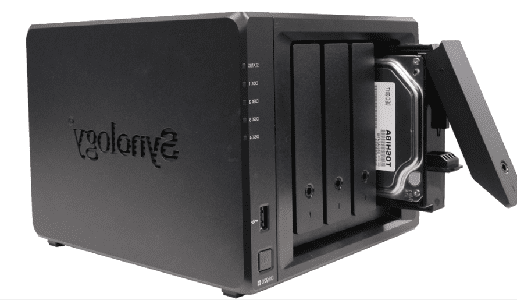
On the front you have the four drive bays, with independent drive locks and an easy, tool-less system to add or remove drives. There’s also a front USB 3.0 port, power button, and LED status indicators. The black enclosure measures 6.5 by 7.8 by 8.7 inches (HWD) and weighs 4.9 pounds.
Ports
At the back you’ll find another USB 3.0 port, an eSATA port for further drive expansion, and two 1GbE network ports with Link Aggregation / Failover support. For us, this is a slight disappointment – Synology definitely had the opportunity to upgrade these to 2.5GbE ports to make this NAS more future-proof, but seems to have ignored this on this model.
Capacity
With four drives in place, the Synology DS920+ supports a maximum raw capacity of 64TB (4 x 16TB drives), depending on what RAID setup you’ve selected. This can be expanded to a further 144TB with the addition of a Synology DX517 expansion module connected to the eSATA port.
Processor and RAM
Internally, the Synology DS920+ now features an Intel Celeron J4125 processor running at 2.0GHz (2.7Ghz in burst mode), and comes with 4GB of DDR4 RAM installed. You can slot in an additional 4GB into the memory slot that’s located inside next to the drives, but 8GB is the max you’ll get to.
Apps
This is a Windows-like operating system that makes it easy to configure drives, handle security, monitor NAS health, and create shared folders, as well as download even more apps from Synology and third-party partners to perform different or more specialized tasks. When you first launch DSM, it’s populated with icons labeled Control Panel, File Station, Package Center, and Help. Off to the right is a System Health window that displays CPU and RAM usage. You can populate the desktop with more icons as you download apps.
Synology DS920+ Performance review
To test NAS file transfer performance, we transfer a 4.9GB folder containing a mix of video, photo, music, and office document files between the NAS and a host PC. The test then times both the read and write speeds. The DS920+ turned in a respectable score of 85 megabits per second (MBps) on the write test, beating the TerraMaster F5-422 (80MBps) and the QNAP TVS-463 (79MBps). The Asustor AS5304T led with a score of 98MBps. Similarly, the DS920+’s read score of 90MBps was slightly faster than the TerraMaster F5-422 (89MBps) and the QNAP TVS-463 (85MBps) but not quite as speedy as the Asustor AS5304T (96MBps).
How to do 20GB Synology DS920+ SSD RAM upgrade?
Required tools
- A Synology DS920+ NAS – Obviously
- 1x Crucial 16GB DDR4 SODIMM 2666Mhz (20GB Total) Memory Upgrade
- Small Phillips Head Screwdriver – (kinda optional but recommended for chassis)
- (OPTIONAL) Anti-static gloves and Envelope – useful to eliminate static charges and also to store the removed older official memory sticks)
Step 1: Disconnect power and remove HDD or SDD
First, we need to ensure that the mains power has been disconnected and the Synology DS920+ is completely powered down/off.
Step 2: Remove Hard Drive media
Be sure to keep a note of the drives that you remove and the order they were installed (HDD Bay 1, HDD Bay 2, etc) as installing the drives in the wrong slots could damage any existing RAID you have setup internally. You should remove the hard drive media as the unit will be moved around a lot during the memory installation and this could damage the drives.
Step 3: Eject memory sticks
As the new 20GB of memory for our Synology DS920+ will occupy both slots, we need to access and remove the existing memory,
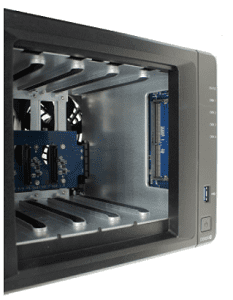
Be sure you eject the official memory sticks using the clips either side of the slot, as well as only holding the memory sticks by the narrow side edges, never touching the chips or board of the money or NAS.
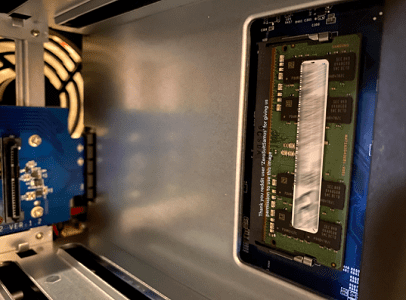
Step 4: Install new memory stick
Once they are clear, install a 16GB Crucial Memory stick in the available slot, making sure that you click them both in with the clips either side.
Once down, replace the Synology DS920+ chassis lid if you removed it for ease of access, as well as the hard drives. You have now concluded the physical installation of 20GB of crucial memory in the Synology DS920+.
20GB Synology DS920+ Memory Upgrade –check 20GB Memory is Recognized
Step 1: Power up Synology DS920+ NAS
What you will need:
- A web browser (Chrome, Safari, Firefox, etc) on a Windows, Mac or Android Machine) accessing the Synology DS920+ user-interface as you normally would.
Next you need to power up your Synology DS920+ NAS and access it as you normally would. If you are buying this NAS first time and have yet to set it up, there are numerous first time set up guides and tips on the SPANTV YouTube channel here – that will get you from the hardware installation to set up the Synology DS920+ NAS for use. Once the NAS user interface (UI) is ready to go, head over to the hardware specification page shown here:

It will be immediately available for use and you will see that the % amount of use of the RAM in the resource monitor will be much, much lower, as there is significantly more memory available for the system! As you can see from this CPU and Memory display, the Synology DS920+ has recognized and made available the 20GB of crucial memory.
20GB Synology DS920+ SSD RAM Upgrade – Checking the 20GB Memory is Working
There are several ways to check the memory is working on your Synology DS920+ correctly. One easy method that can be done very quickly is using the Synology Memory Test tool.
To run a memory test:
- Download and install the Synology Assistant, where you can find the memory test function. The application is available at Download Center.
- Open Synology Assistant, click and enable the memory test service.

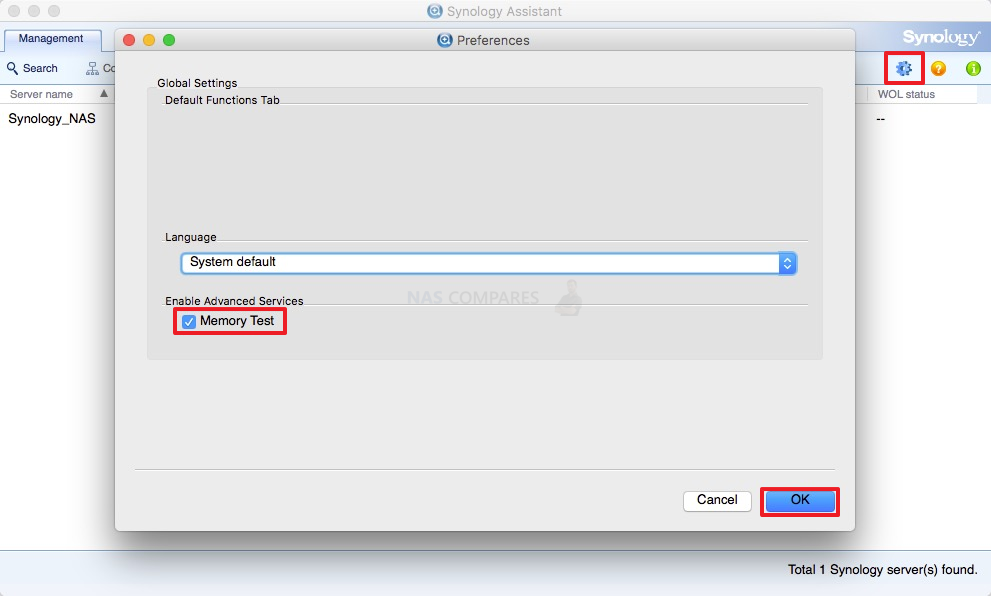
- Select the device where you wish to run the test and click Memory Test.

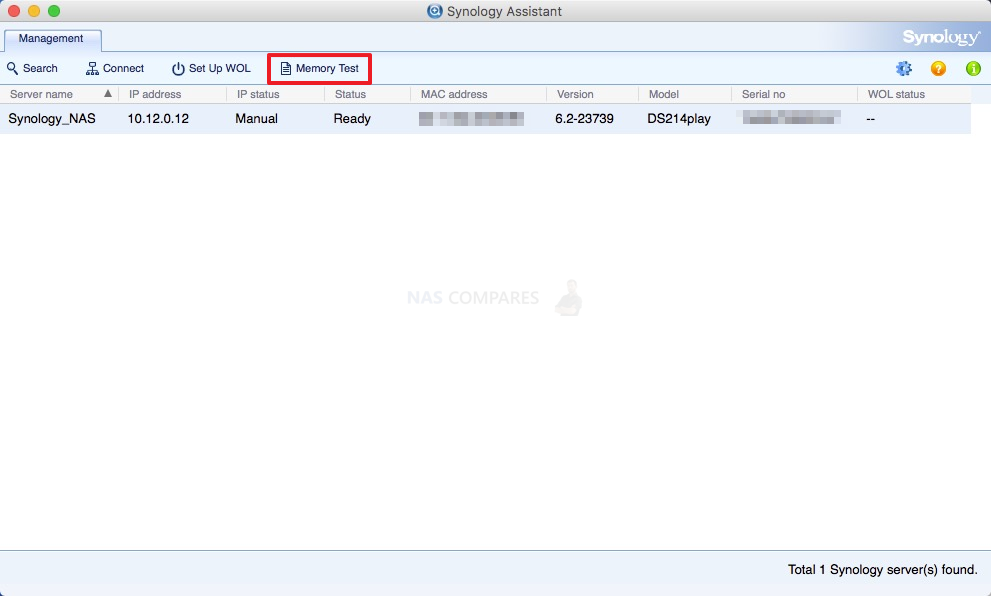
During the memory test, your Synology NAS will be rebooted. It will recover after another reboot if its memory is normal and passes the test. However, if the memory test fails to finish or shows that there is an error, the memory may be faulty. In this case, you are strongly recommended to return your Synology NAS for repair. Just in case you have installed a non-Synology memory module, please remove it and rerun the memory test. Though once again you should remember that Synology do not recommend using memory modules that are not from Synology themselves, so this test may not be indicative of the health of unofficial memory in your Synology NAS.
Alternatively, you can perform as many actions and processes as possible (scans, copy/pastes, thumbnail generation, transcode a 4K file, RAID changes, synchronisation, etc) at once to see how the task manager and resource monitor behaves in the Synology DS920+. It should spike each time and at a greater height as you do more and more and once it exceeds the memory you had previously installed, this is a good confirmation that the installation is working fine.
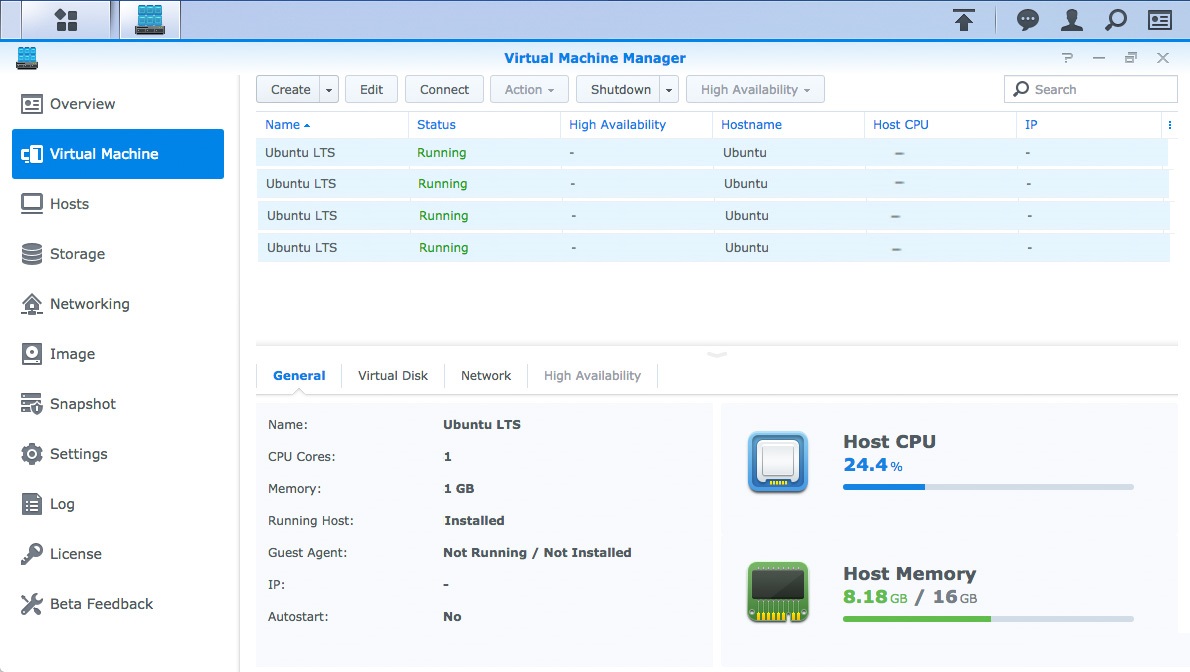
Alternatively, you can temporarily allocate chunks of memory and then that is a much more reliable test. Install the virtual machine application for the Synology DS920+ (P.S. for Synology users it is the Virtual Machine Manager and for QNAP it is the Virtualisation station).
Then you can create individual VMs (it is alot easier than it sounds and the Synology DS920+ VM software is very user-friendly) then allocate 3-4GB of memory to each one. When you have created 3 or 4 individual virtual machine containers on the Synology DS920+ software, then you can run them all at once and that will immediately use almost all the memory at once!
If there are any issues with the memory, it will show here almost immediately. If no problems, then you know the Synology DS920+ 20GB crucial memory installation as successful. You can then delete the VMs in the virtual machine software and then free up all that memory again.
Editor’s recommendations
- CalDigit TS3 Plus thunderbolt 3 dock – 87W charging 7X USB 3.1 ports USB-C Gen 2
- Intel laptop processor comparison chart i3, i5, i7 – tips and tricks
- Corprit portable monitor review – does it work with Raspberry?
- Samsung Galaxy S20 Ultra 512GB out of stock – find reviews & price?
- Vankyo MatrixPad Z10 tablet android 9.0 pie tablet 10 inch review