
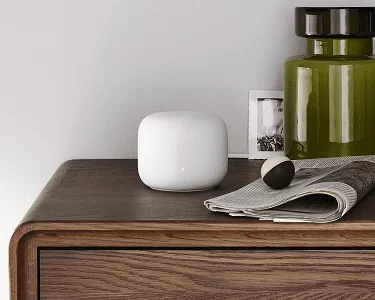
Google Nest WiFi intelligently works behind the scenes to make sure your WiFi remains fast; so you can walk from room to room on a video call with an uninterrupted signal; and automatic updates help your network stay safe and sound. Nest WiFi is a scalable and flexible WiFi system. If you need more coverage, add nest WiFi points for an additional 1600 square feet of WiFi and a smart speaker with the google assistant. Nest WiFi is also compatible with google WiFi. Nest WiFi is easy to set up in the google home app; connect and manage devices in your network; plus pause WiFi to limit screen time for the kids. What are the Google Nest WiFi | setup instructions with Google WiFi and Verizon FIOS?
Specifications – Google Nest WiFi
| Google Nest Wifi | |
|---|---|
| Bandwidth Range | 2200 Mbps |
| RAM | 1 GB |
| Processor | Quad-core 64-bit ARM CPU 1.4 GHz |
| Gigabit Internet | Yes, it supports Gigabit internet |
| Wi-Fi Standard | Wifi 5 (802.11ac) |
| Number of Bands | Dual Band (2.4GHz and 5GHz) |
| Device Priority | Yes |
| Quality of Service | No |
| MU-MIMO | 4×4 MU-MIMO |
| Ethernet Ports | 1 |
| Range (With one additional Wi-Fi point) | 3800 square feet (2353 Sq Meter) |
| Number of Devices (With one additional Wi-Fi point) | 200 |
| Gameplay Experience | No lags, chokes, or losses on cable internet with other users on the network |
Requirements for Google Nest WiFi | setup instructions with Google WiFi and Verizon FIOS
- A Google Nest Wifi router.
- Any additional Wifi devices you would like to add (Google Nest Wifi points, Google Wifi points, or Google Nest Wifi router). This is optional to expand coverage.
- A Google Account.
- One of the following mobile devices:
- An Android phone running Android 5.0 or later
- An Android tablet running Android 6.0 or later
- An iPhone or iPad with iOS 12.0 or later
- The latest version of the Google Home app available on Android or iOS.
- Internet service
- Some ISPs use VLAN tagging. You may need additional equipment for Google Wifi to work. Learn how to set up your network with an ISP that uses VLAN tagging.
- Modem (not provided).
Note: We strongly recommend purchasing Nest Wifi from the country where you’ll be using it. Since wireless regulations vary by country, you may experience compatibility issues if you move your Wifi device(s) to a different country and Google will be unable to offer support. If you’re setting up a mesh network, we recommend purchasing all of your Wifi points in the same country.
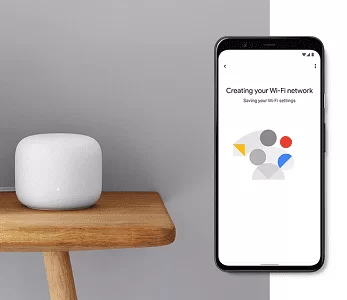
How to do Google Nest WiFi setup with Google WiFi?
Before you set up the Google Nest Wifi router, make sure your modem is working and connected to the Internet. The router is the unit with Ethernet ports on the bottom.
- Download the Google Home app on Android or iOS.
- If this is your first time using the Google Home app, set up a home.
- Choose a location for your router.
- Your router will need to be connected to a working modem that is connected to the Internet.
- For the strongest signal, place your router at eye level, in plain view, like on a shelf or TV stand.
- Learn more about where to place your router.
- Connect the Ethernet cable to your Nest Wifi router’s WAN port
 . Then, connect the other end to your modem.
 - Plug your Nest Wifi router into a wall outlet. After about a minute, the light will pulse white to indicate that it’s on and ready for setup.
- On your phone or tablet, open the Google Home app
 .
. - Tap Add device or service

 Set up device.
 - Under “New devices,” tap Set up new devices in your home.
- Choose a home.
- Select your Nest Wifi router.
- Scan the QR code on the bottom of your device.
- Hold your phone about 5 inches (12 cm) away to scan. Learn more tips for scanning QR codes.
- If you’re unable to scan the QR code, tap Continue without scanning, then enter the setup key on the bottom of your device.
- Select a room for your router or create a new one.
- Give your Wi-Fi network a name and a secure password.
- The router will now create your Wi-Fi network. This may take a few minutes.
- If you’d like to add another Wifi device, tap Yes in the app to continue or follow the steps below to add a point at a later time.
Steps to add a point or an additional router
Google Nest Wifi devices and Google Wifi points can be added to the network you’ve created with your router. All additional Wifi devices added, including Google Nest Wifi routers, are considered points in the mesh network. Once you’ve decided where to place your point and plugged it in, use the Google Home app for setup.
- Open the Google Home app .
- Tap Add device or service Set up device.
- Under “New devices,” tap Set up new devices in your home.
- If prompted, choose a home.
- Select the device you would like to set up as a point Next.
- Scan the QR code on the bottom of your device.
- Hold your phone about 5 inches (12 cm) away to scan. More tips for scanning QR codes.
- If you’re unable to scan the QR code, tap Continue without scanning, then enter the setup key on the bottom of your device.
- Your point will now connect. For Nest Wifi points, when you hear a sound from your speaker, tap Yes.
- Follow the in-app instructions to finish set up.
- If you’d like to add another point, tap Yes in the app when prompted or repeat these steps at a later time for additional points.
- Once you’ve added all of your Wifi devices, the app will perform a mesh test to confirm everything is working.
How to set Google Nest Wifi security features?
Google Nest Wifi router has several built-in security measures to protect you and your online world.
WPA2 & WPA3 security
Google Nest Wifi secures your Wi-Fi network with either WPA2 protocol or the newer WPA3 protocol. Using WPA3 protocol makes your Wi-Fi network highly resistant to security risks like offline dictionary attacks.
By default, Google Nest Wifi uses the WPA2 protocol to maximize compatibility with legacy connected devices (such as phones, tablets, or laptops). However, you can turn on WPA3 transition mode in the Google Home app. This setting allows both WPA2 and WPA3 devices to join your Wi-Fi network. Note: some legacy WPA2 devices may be incompatible with WPA3 and experience connection issues when WPA3 transition mode is on. Note that OnHub devices do not support WPA3.
Google Nest Wifi doesn’t support legacy protocols like WPA and WEP because they have been deemed unsecure by the Wi-Fi Alliance and industry experts. There are also known and documented attacks against WEP and WPA. WPS, a mechanism that lets a device join a wireless network without entering a password, is also not supported for security reasons.
To turn on WPA3 transition mode:
- Open the Google Home app .
- Tap Wifi
 .
. - At the top right, tap Settings
 .
. - Turn on WPA3.
Note: When you toggle WPA3 on or off, your network will restart and devices will lose connectivity
Firewall
Google Nest Wifi’s firewall creates a barrier between your Wi-Fi network and the Internet, protecting your data from unsolicited connections or connection attempts. It’s a stateful firewall, meaning it keeps track of connections (TCP streams, UDP communication) traveling across it. Only data associated with a known, active connection is allowed through the firewall.
Note: Settings like UPnP and port forwarding allow devices to bypass the firewall and have an open connection, leaving them potentially vulnerable.
TLS
All communication between Google Nest Wifi and Google is secured by Transport Layer Security (TLS). This is a protocol that ensures privacy between a device and a server, making sure no one else sees or tampers with the message.
Automatic updates
Google Nest Wifi receives automatic software updates to make sure you always have the latest security features and protection from recently discovered security threats. These updates may include open source components and go through several rigorous reviews.
All software updates are signed by Google. Google Nest Wifi can’t download or run any software that isn’t signed and verified.
How to do Google Nest WiFi setup with Verizon FIOS?
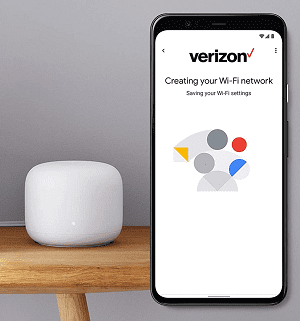
1. Make sure the Ethernet cable are connected to the right ports – cable should be connected to the ONT’s Ethernet/LAN port and the other end should be connected to your Google Nest Wifi router’s WANport (globe symbol).2. Connect your phone/device – to the setup SSID of your Google Nest Wifi router.
- Turn OFF mobile/cell data if possible and go to your phone’s ‘Wifi network settings’ > on the ‘list of WiFi networks’, look for a setup network name that says “setup****.ybd”, it will ask you to put in a password which will be the setup code located on the base of the unit itself.
- Once connected, open your phone’s browser and go to this link – http://192.168.84.1/api/v1/status
It will show a status report and you should see a page like this.
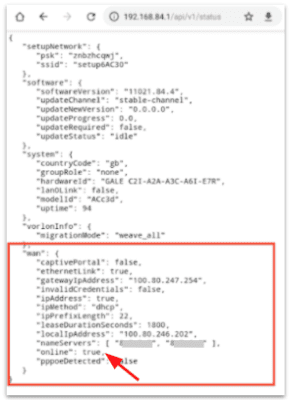
- Kindly scroll down until you see word “online”: under WAN section. If it says true, then it indicates that your Nest Wifi router is getting an internet connection from the ONT and there might be different reason why the setup is not going through. If it says false, then the device is not getting internet connection from the ONT and you may need to contact Verizon for further assistance.