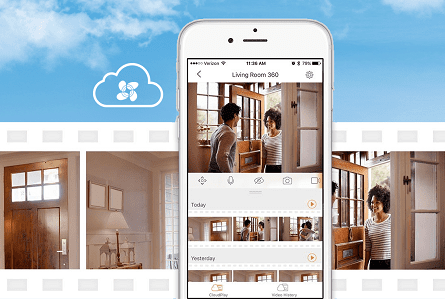
EZVIZ video camera can capture the entire room with responsive one-touch pan and tilt controls and digital zoom. The Unique panoramic touch navigation takes a 360° picture of the room, and allows you to view live video at the angle you want by a simple tap. Track and record any moving objects seen in the room with smart motion sensor. Mini 360 Plus offers up to 33 feet of clear night vision, HD 1080p resolution, and a 92° wide angle lens which makes objects being tracked easily visible, even at night. Sometimes user asks ‘How to delete EZVIZ video history?’

EZVIZ video camera for sale
AI-Powered Person Detection Colour Night Vision H.265, IP67 Waterproof, Customizable Detection Zones, 2.4GHz WiFi Supports MicroSD
advertisement
To delete videos from the cloud;
1. Open the EZVIZ app and sign into your account
2. Tap on the camera that you would like to delete videos from
3. Under the CloudPlay tab you will see all your recorded videos. Look for the trash can icon and that will erase the video.
Follow the mentioned steps on how to delete EZVIZ video history to get your desired output.
How to delete a device from your EZVIZ account?
Follow the steps below to delete the camera from your EZVIZ account using your mobile app.
1)Log into the EZVIZ account
2)Tap on the image of the camera to open the “live view” page
3)From the top right corner, tap on the “gear icon image” to open the device settings page
4)From the top right corner of that screen, tap on “more” and tap on “Delete Device” and choose “OK”
NOTE for CloudPlay Subscribers: If you are a CloudPlay subscriber the option to “Cancel Subscription” and/or “Delete Video Clips” store in the EZVIZ Cloud Storage service is also provided here.
How to delete EZVIZ device from previous account?
If you would like to use EZVIZ in other device, how to delete EZVIZ device from previous account? Find below helpful steps –
- Tap on the More tab.
- Tap on the “AccountSecurity”
- Tap the “Delete Account”
- Please make sure that all thedevicesunder thisaccounthave been removed before youdeleteyouraccount.
How to stop recording to CloudPlay?
You can stop recording at any time during the subscription. The subscription will not be cancelled or extended by stopping recording. After you stop recording, the camera will not record any new clips in the cloud storage, but you can view and playback the video clips and the alarm history within the storage period.
For example, you are on a 7-day cloud storage plan. When you decide to stop recording on Jan. 8th, you can playback the history recorded from Jan. 1st to the moment you stop recording. On the following day, you can view and playback the history recorded from Jan. 2nd to Jan. 8th. By Jan. 15th, all the data will exceed the number of days of storage and be erased.
Once the subscription is activated, the subscription period starts immediately, and it will not stop when you stop recording. For example, you activate the service on Aug 15st, and your subscription period is one month. If you stop the cloud recording between Aug 20th and Aug. 30th, the subscription period still ends on Sep 15th.Deleting your EZVIZ device data from CloudPlay
You can delete your device data any time during the subscription. When you delete device data, you will clear your video and alarm history in the cloud storage associated with the selected device. There is no option for recovery once the data is permanently deleted.
Your CloudPlay subscription will not be stopped, cancelled or extended by deleting the device data.Deleting your EZVIZ device from your account
You can delete your device any time during the subscription. When you delete your device, you can choose to clear your video and alarm history in the cloud storage associated with the selected device. There is no option for recovery once the data is permanently deleted.
You can also choose to terminate the subscription associated with the selected device. The residual service period of the existing subscription will not be refunded.
How to set camera to 24/7 recording?
Download the PC application, “EZVIZ Studio”. Login into the account, Go to device advanced settings, Click “Event-Schedule-Recording Schedule” and choose all-day recording template.
How to visit the “Advanced Setting” of Ezviz Studio?
1. Go to the root directory of Ezviz Studio in your PC and find the folder named “config”.
2. Copy the file named “AppConfig.ini” in the folder of “config” to desktop. Open “AppConfig.ini” in desktop
3. Add the following command which highlighted in yellow in “AppConfig.ini” and save before exiting.
[LocalOperation]
Show=1
4. Copy the “AppConfig.ini” file in desktop to folder of “config” and overlay the old one. Refresh the device page in Ezviz Studio or reopen the Studio, then you will see the “Advanced”.
5. If you want to hide the “Advanced” setting, please change the command “Show=1” to “Show=0”, then reopen the EZVIZ studio.
How to Share your Device with Friends and Family?
Sharing can be done in two different methods:
- The same device can be viewed using the same login credentials, this means when you give your friend, family member your username and password you can actually view the same device in that account at the same time.
- The second method is by sharing your device with your friend. This means you can give your friends and family privileges to view your device without owning the device. (Your friend will need to open an free EZVIZ Cloud account)
This second method can be achieved using our advanced setup platform from the Web Portal. Follow the steps below to share your device:
1. Log into your EZVIZ account from the web by visiting our website (click on the link below)
2. Click on EZVIZCloud sign-inlink found on the horizontal navigational menu
3. Sign into your account by entering your username and password
4. On the top right corner of the page click onSystem Management
5. Click on the friendManagement Tabon the left corner of the screen and click onAdd Friends
6. Enter your friend’s email associated with EZVIZ account, a brief remark and assign the device that you will like to allow that user to view
(Note – You can only share your video with a friend that has an EZVIZ account). Live view is enabled by default, but you can choose to allow the user view the playback and receive alarm notification messages.
7. Once you finish assigning the device and granting the privileges, scroll to the bottom and click on thesaveicon