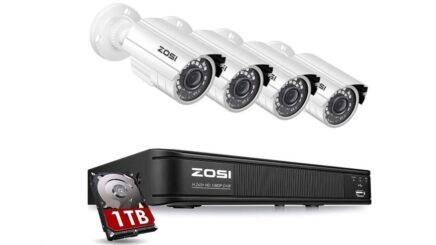
View and control your security system locally by connecting the system to a monitor without internet, or via free ZOSI Client software on Windows or Mac, or via iOS & Android APP (ZOSI Smart ) on mobile devices remotely. How easy is ZOSI 8Ch security camera system installation? You can also playback significant evidence or funny videos records by searching different days, hours or minutes. Exclusive ZOSI 8 Channel 5MP-Lite DVR Recorder paired with 4 Weatherproof 1080p metal bullet cameras with 80ft night vision and 90°view angle (It allows you to add 4 more 1080p or 5MP 12.5fps cameras). 60FT BNC+DC CCTV cabling provides both video and power to your cameras, more stable and reliable than wireless security system.(1TB security certified hard drive was pre-install inside the DVR). Find everything you need to know about ZOSI 8Ch security camera system reviews, installation and setup tips.
How to do ZOSI 8Ch security camera system installation
Step 1: Choose the location
For surveillance cameras, the location is directly related to the imaging effect. For indoor installation, we should ensure that the height of the equipment is not less than 2.5 meters. And in the outdoor environment, we should also place the monitoring equipment at a height of more than 3 meters from the ground. Otherwise, whether considering from the self-protection of camera or equipment monitoring, the cameras may not be able to obtain its best monitoring effect.
Step 2 : Source of power
The security camera needs to be powered separately. Therefore, when performing strong electrical wiring, you should give priority to safety. It can be tested with a multimeter and a voltage tester to ensure that the power is turned off and then set up the electrical wiring.
There are two kinds of power supply modes: DC power supply and PoE (Power over Ethernet) power supply. Compared with DC power supply, PoE only needs to be connected to the PoE switch or the PoE NVR for power supply which are simpler and more convenient for setups.
PoE cameras like ZOSI 1080P PoE Security Camera can be a better option that help you free from messy cablings. With only a single ethernet cable connecting each IP camera to the NVR for both power and video transmission, PoE cameras ensure safe and quick power and video transmission at the same time.
Step 3 : Mount the camera
ZOSI cameras are commonly with WDR, which enable to see and capture clearer image even under different lighting. So even in a relatively worse lighting set, ZOSI cameras with WDR can compensate the light to obtain a vivid and vibrant image.
For the wall, you can use the percussion drill to hit a hole, plug the plug, and then use the confess thread to fix the bracket to the wall.
As for the ceiling, you may put the wooden block on the top and let the confess thread screw through the ceiling into the wooden block. Nowadays, there are also many cameras that are easy to install whether on wall or on ceiling.
ZOSI 1080P PoE IP Camera comes with 3-axis mounting bracket, you can easily secure the camera on wall or on ceiling and adjust the angle.
Mounting brackets of the camera should also be noted. In order to secure the cameras, especially in an outdoor scenario, you should better choose the special bracket for outdoor cameras. Otherwise, the camera may easily change its position whenever a gust of wind or a heavy rain comes.
Step 4: Cabling or connecting
For IP cameras, its route erection options are obviously more abundant than traditional security cameras. However, no matter which transmission method is used, interference is one of the problems we have to deal with.
Especially for the video signal transmitted by cable, the same direction transmission of the signal line and the high-power wire is undoubtedly a taboo in the wiring process, and it is not allowed to put the two in the same transmission line tube for convenience.
Even if you are unable to separate the two given that they are restricted by the environment, you must ensure a separation distance of at least 0.5 meter. Only in this way can better avoid the influence of strong magnetic interference on video transmission.
Step 5 : Attach Auxiliary Equipment
In addition to some of the aspects mentioned above, some of the camera’s auxiliary equipment installation specifications are also part of your work during the installation.
For example, to make the installation position of the camera PTZ, rack and other equipment meet the design requirements, the installation should be stable, and easy to operate and maintain. The distance between back and side of the rack to the wall should be in line with the maintenance requirements.
For the links with complex lines, you should also mark down the purposes and characteristics of each line for future maintenance and grooming. The above mentioned are the key points we need to focus on when setting up a simple network monitoring system.
How to do ZOSI 8Ch security camera setup with mobile phone?
Here we take ZOSI A3 battery-powered security camera as an example to show you the whole CCTV camera mobile setting & connection process.
Step 1. Install the battery to the camera. Make sure this camera is within the WiFi range. (You’ll hear the verbal instruction to help you set up the camera.)
Step 2. Download ZOSI App on App Store (for iPhone) or Google Play (for Android mobile phone).
Step 3. Launch the ZOSI App on your mobile. Click the ”+” button in the top right corner to add the camera.
Step 4. Scan the QR code on the camera and then click ”Connect to Wi-Fi” to continue.
Step 5. Click the button ”I have heard the voice prompt” to continue to the next page.
Step 6. Enter the WiFi password of your WiFi network, and tap ”I have entered the correct information” to continue.
Step 7. A QR code will be generated on your phone. Place the QR code on your phone to let the camera scan it.
Step 8. Name your camera and create a password. Now you can get live streaming!
How to do ZOSI 8Ch security camera setup to TV/Monitor with DVR/NVR?
Here we take ZOSI EN-2615W8S PoE NVR system as a typical example to show you the steps of CCTV camera system connection to a computer monitor.
PoE IP CCTV camera system cable connection diagram
Step 1. Install the camera(s) to the position you want.
Step 2. Use the Ethernet Cat 5/6 cables to connect the cameras to the NVR.
Step 3. Connect the NVR to your monitor or TV with the VGA/HDMI cable.
Step 4. Power the NVR with the power adapter.
Step 5. Turn on the TV or computer. The live streaming should appear on the screen.
The security camera systems with Ethernet Cat 5/6 cable connection are easier to install compared with the analog type, since the Ethernet cable can carry both power and data transmission. So you don’t need to run messy wires in or around your property.
How to ZOSI 8Ch security camera setup to TV with/Without DVR or NVR?
You can follow the below steps to hook up your security camera to TV & VCR for local live streaming and recording.
Step 1. Install the camera to the place you want to keep tabs on.
Step 2. Use an RCA cable to connect the camera to the VCR.
Step 3. Plug the camera into the power outlet with the power adapter.
Step 4. Use another RCA cable to connect the VCR to your TV.
Step 5. Adjust the TV and VCR into channel 3 or 4 to get the live streaming.
Step 6. Insert a VHS tape into the VCR, and then press the Record button to get video recordings.
Always keep all the devices running when you view live steaming from your TV. The above steps apply to analog CCTV camera connection to TV without DVR.