As DIY home security maker, do you need help on Ring Alarm wireless home security system installation tips? Ring Alarm puts whole-home security at your fingertips. Get alerts on your smart phone when doors or windows open or motion is detected. You can manage Ring Alarm and other Ring products—including Ring Doorbell—with the Ring app. Get 24/7 professional monitoring to help you reach emergency services and to enable cellular backup for your Ring Alarm and 60 days unlimited video recording and photo capture for your Ring cameras and doorbells for $10/month with Ring Protect Plus. Enable the plan after your free 30-day trial and cancel at any time. How to do Ring Alarm wireless home security system installation?
Price and availability
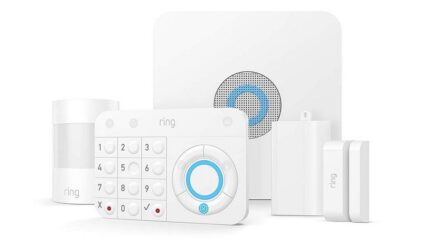
Priced at $199 for the base kit, the Ring Alarm comes with a base station, a separate keypad, one motion detector, one contact sensor for a door or window, and a range extender to help make sure all of your Ring accessories remain connected to your network.
Additional contact sensors ($20), motion detectors ($30), keypads ($50), and range extenders ($25) can be purchased separately to expand your system. Other Ring Alarm accessories including a flood and freeze sensor as well as a smoke and CO listener to integrate your existing detectors into the Ring ecosystem are coming later.
What are the devices that come with Ring Alarm wireless home security system (installation)?
- Base Station: The Base Station is the heart of the system and is actively connected to and commands all of the Ring Alarm devices connected to the system. This is where all of the functions of Ring Alarm pass through and are controlled from. The Base Station’s functions are:
- Keypad: The keypad (powered by both rechargeable battery or AC)) is an alternate method of controlling the armed state of the Ring Alarm system. By typing on the Keypad, users can arm and disarm the system, bypass certain sensors, or trigger the alarm.
- Contact Sensor: Contact Sensors are magnetic sensors that are placed at doors and windows that can tell when they’re opened and (assuming the device is active in your current mode) trigger the alarm and inform the monitoring center. Extra contact sensors can be purchased separately.
- Motion Detector: Motion Detectors use passive infrared scanning (PIR) to detect motion in a given area. Once motion is detected they will send an alert and (depending on system settings) trigger an alarm. At least one Motion Detector comes in the box. Extra motion detectors are available.
- Range Extender: The Base Station and Ring Alarm sensors communicate with each other using a secure mesh network called Z-Wave. This is not wifi and will not interfere with wifi signals. A Range Extender extends the mesh network with which Ring Alarm components communicate with each other as well as the distance the base station can communicate with a device.
Steps for Ring Alarm wireless home security system installation (tips)
Ring Alarm wireless home security system installation is quite simple, and the whole process only took me about half an hour, although I used the included adhesive strips to mount sensors and didn’t mount the base station and keypad to my walls, so it would have taken a bit longer if I’d gone all-in with hardware mounting options. I may yet do that once I’ve decided for sure where I want to put the various components.
Regardless of whether you go the adhesive or hardware route, Ring provides everything you need right in the box, with installation kits for each component of the system conveniently boxed and labeled to make it easy to find what you need. All you’ll need if you want to use the included screws and anchors for hardware mounting are a screwdriver and a drill.
Step 1: Download the Ring App
First, download the Ring – Always Home app for your iOS or Android device.
Note – If you already have the app on your device, before you begin setting up your Ring Alarm, make sure you have the latest version of the Ring app from the app store.
Step 2: Register for Ring account
If you don’t already have a Ring account, register with your email and a password. Otherwise, log in.
Let see how to create your account.
- If you’re new to Ring, tap Create Account. The app will ask you to enter your home or property address, your name, and email address, then ask you to create a password.
- If you already have a Ring account used for other Ring devices or Ring.com, use it to log in to the Ring app.
Now you’re ready to begin setting up your Ring Alarm.
Step 3: Click on ‘Set up a device’
In the app, click on “Set up a device,” either on the home screen or in the settings menu.
Step 4: Specify your device
Choose “Alarm” from among the options Ring provides to set up.
Step 5: Verify your address
The app will prompt you to confirm your address if you already have an account, or to provide your address if it’s a new account. This information is required to activate the Ring system, as each location can only have one Alarm Security Kit installed.
Step 6: Choose right places
The keypad is one of the main ways you’ll interact with your Alarm Security Kit, aside from the Ring app. You’ll need it for arming/disarming and other features, so make sure to place it somewhere near the door you use most often when you’re coming and going.
Think about where you want to install your Alarm Security Kit, from the Wi-Fi-enabled base station to the keypad and the sensor accessories. You’ll want to put the siren-equipped base station in a place where you’ll actually hear the siren, and make sure it’s within range of your Wi-Fi router.
Step 7: Connect the base station
Follow the steps in the app to connect your base station. Plug the included base station adapter into an outlet and then into the base station. The light in the center will turn blue. Then, press the pairing button on base station for it to enter pairing mode.
You have the option to enter your Wi-Fi info — or connect directly to your router via the included ethernet cable.
Step 8: Place Sensors and Motion Detectors around your home
The rest of the devices in the kit are similarly easy to install. Follow the steps in the app to connect the keypad, the range extender, the motion sensor and the door/window sensors.
Once your Base Station is set up and your devices are connected to the Base Station, you can start placing your sensors and motion detectors around your home. The correct placement of these sensors is critical in protecting your home, so you might want to check out the following articles that give some advice on the correct placement of Sensors and Motion Detectors.
The keypad comes with a power adapter, but it’s supposed to be able to run on the rechargeable battery for months. The motion and door/window sensors are also battery-powered. The range extender plugs into a wall outlet. You’ll be asked to assign each device a unique name so you can more easily tell them apart in the app and when you receive alerts.
Step 9: Use the system
Your Ring Alarm Security Kit is now installed and ready to use. Familiarize yourself with the app and the different modes — disarm, home and away — that you can switch between, depending on your status. You can also customize your settings in the Ring app, as well as enable the siren built into the base station.
Ring also gives you the choice to sign up for its optional Ring Protect Plus professional monitoring service, starting at $10 per month (or $100 per year).
How to use different security modes – Ring Alarm installation tips?
Security Modes
Security Modes are the different settings on your Ring Alarm that will protect your home in different ways depending on your current needs.
The three different Modes available on your Ring Alarm are:
- Disarmed: When Disarmed, no sensors in your home will be monitored and no alerts will be sent to the monitoring station although the system will still be powered on and functioning. Use Disarm when you’re at home and want the freedom to go in and out of your house easily. Fire and CO sensors (if they are attached to the system) will still be monitored.
- Home Mode: In Home mode, only certain sensors will be monitored. Home mode is most often used when you would like the perimeter sensors (doors and windows) of your house monitored but want to be able to move freely around the inside of your home. You can control which sensors will be monitored in Home mode by setting them in your Ring app. To do this:
- Tap the Menu (three-lined icon on the upper left-hand side of your screen)
- Tap Settings
- Tap Modes
- Tap Home
- Tap Sensors
- Tap which sensors you would like monitored while in this mode.
- Away Mode: When Away Mode is turned on, all of your sensors will be monitored and an alert will be issued if any of them are faulted. Away Mode is the mode to use to secure your house when leaving your home. Note that you can also control which sensors will be monitored in Away mode by setting them in your Ring app. To do this:
- Tap the Menu (three-lined icon on the upper left-hand side of your screen)
- Tap Settings
- Tap Modes
- Tap Away
- Tap Sensors
- Tap which sensors you would like monitored while in this mode.
Arming your system – ring alarm installation tips
There are two ways to arm your system, by using the Ring App or by using the Ring Alarm Keypad.
To arm your system using the Ring app:
- Open your Ring app
- You will see the same Security Mode icons you’ll note on your on your Ring keypad.
- Tap the Home or Away mode.
To arm your system using the keypad:
- Enter your user code.
- Press the Home Mode button or Away Mode button.
When you have changed your mode, your system will begin a timed countdown before arming itself. This is called an “Exit Delay,” and it gives you time to leave your home before the system arms itself. This system can be set to Home mode with a delay time ranging from 0 to 180 seconds or Away Mode which can be set between 0 and 180 seconds.
To configure your exit delay:
- Tap the Menu (three-lined icon on the upper left-hand side of your screen)
- Tap Settings
- Tap Modes
- Tap “Home” or “Away.”
- Tap Exit Delay.
- Set the exit delay for the amount of time you wish.
Disarming your system – ring alarm installation tips
There are two ways to disarm your system, by using the Ring App or by using the Ring Alarm Keypad.
To disarm your system using the Ring app:
- Open your Ring app
- You will see the same Security Mode icons you’ll note on your on your Ring keypad.
- Tap Disarmed.
To disarm your system using the keypad:
- Enter your user code.
- Press the Disarmed button.
When you enter your home, your Alarm system begins a timed countdown before it sets off the alarm. This is called an “Entry Delay,” and it gives you time to enter your home and disarm the system before it goes off. This system can be set with a delay time ranging from 0 to 180 seconds.
To configure your entry delay:
- Tap the Menu (three-lined icon on the upper left-hand side of your screen)
- Tap Settings
- Tap Modes
- Tap “Home” or “Away“
- Tap Entry Delay
- Set the entry delay for the amount of time you wish.
Panic Alarm
The final feature you should be aware of is called “Panic Alarm.” This allows you to send a panic alarm to the monitoring station at any time using a button press combination. To turn on the panic alarm, press and hold the ✓ and X buttons on the keypad simultaneously for 3 seconds. The keypad will then send an instant alarm signal to the hub, the keypad LED Ring will quickly blink red three times, and the speaker will play the panic alarm sound.